GIT: What's Behind Your Usual perations
In my career as a developer and beyond, I have been able to see how much a guy approaching this world tends to focus his energy on learning Frameworks that will make him productive quickly. This approach has a big problem: it leads to neglecting the basics, both of programming and tools.
For this reason, I have recently set myself the goal of filling these gaps.
The first step was to “tell about” GIT starting from the common use of it. Often when asked “Do you know GIT?” we get a similar answer “Yes, I use it.” My opinion is that using something is not the same as knowing it.
Remote and Local Repository
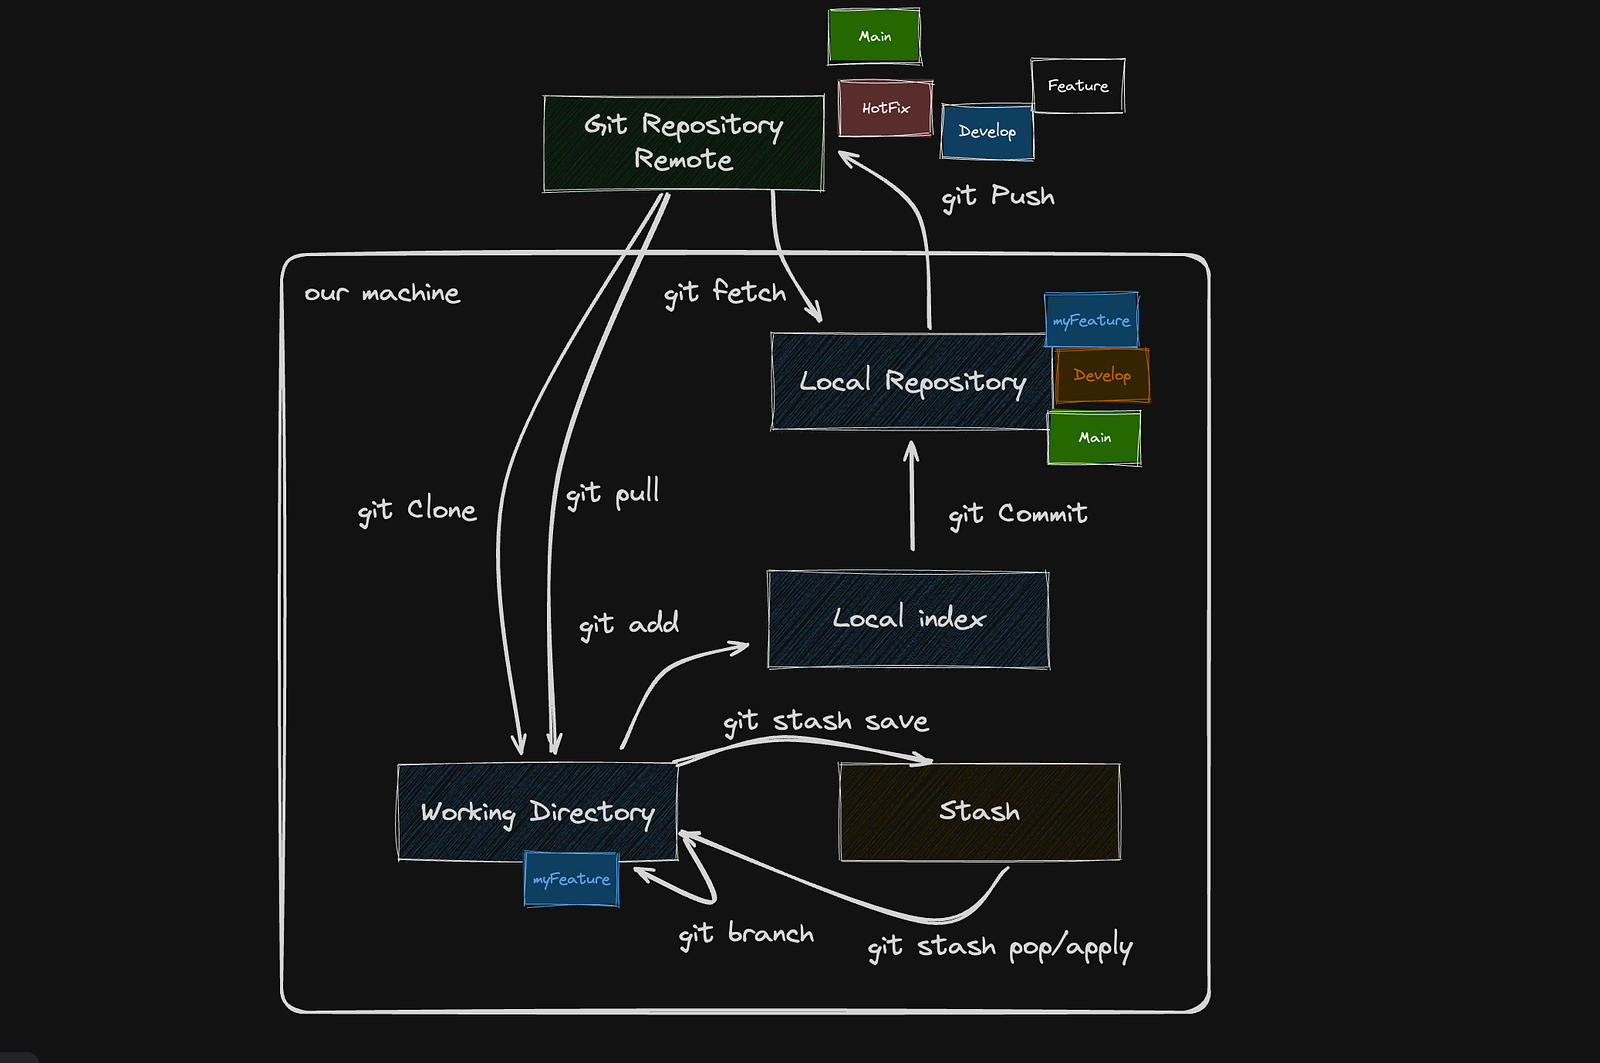
First of all we need to understand our environment structure. When we work with GIT we have distributed code. The code is on a remote location and to develop we need to obtain assets present on it. To do this we can proceed by cloning the remote repository to our local environment.
When we do this using the simple command “clone”, GIT structures our environment creating three different, fundamental elements:
- Working directory: where our working files are located
- Local index (staging area): where Git tracks and saves changes
- Local repository (.git dir): the area that contains all of our commits
Another important element is:
- Stash: the area where Git stores changes that we don’t want to commit and push, in short, set aside
Clone
The first step to obtain the data present on a remote repository is to execute the clone command.
Basically you can run the command defining remote repository:
git clone [repository url]In this case Git prepares your environment downloading the default branch repository (usually main) in the actual directory.
You can also use a lot of options to clone a different branch, to store files in a different directory, and so on. You can find all options in the official git documentation.
📖 Git - git-clone Documentation
Branch
Often, during development, it is necessary to create a local branch based on the current control branch.
To do this, you can use the “branch” command:
git branch feature/myFeature develop📖 Git - git-branch Documentation
Add and Commit
When the developer creates or modifies some files, the data must be sent to the remote repository. To do this, the developer must first add them to the stage (local index) and then to the local repository.
The relative commands are:
git add [filename]
git commit -m "[commit message]"
If the dev creates a new file, he has to use the “add” command to add the file to the stage. Instead, when he modifies or deletes a file, the change is applied directly in the stage.
📖 Git - git-add Documentation
📖 Git - git-commit Documentation
Push
After committing, the developer must send the changes to the remote repository so that the changes are accessible to other team members. The specific command is “push”:
git push <remote>
git push origin
📖 Git - git-push Documentation
Fetch
When other team members push modifications, the developer may need to see this information without updating it in his working directory. The command to do this is “fetch”. It updates only the Local Repository.
git fetch📖 Git - git-fetch Documentation
Pull
After fetch, the developer can also update the working directory and the working branch to use the new code. Simply he can run “pull”. This command retrieves the data from the remote repository and stores it in the working directory (and also updates the local repository as fetch does).
git pull📖 Git - git-pull Documentation
Stash
When you need to update the code in the working directory but have some uncommitted changes, you can preserve the code by moving it to the stash area. After the pull, you can retrieve the code and apply it more recently in the working directory.
Both actions are performed by the “stash” command:
git stash save "my_stash_name"
git stash pop
git stash apply
Note:
applycommand saves stash and overwrites files in the current working tree but leaves the stash history alonepopcommand restores files but then deletes the applied stash
📖 Git - git-stash Documentation
Conclusion
I hope this article is helpful in clarifying the structure of GIT and understanding what happens behind the common operations we use every day.